
Tiled floors and backsplashes add warmth and beauty to kitchens and bathrooms, but keeping the grout lines clean is a persistent household challenge. Because grout is made of a porous cement-and-sand mixture, it readily absorbs dirt, grease, soap scum, and moisture over time.
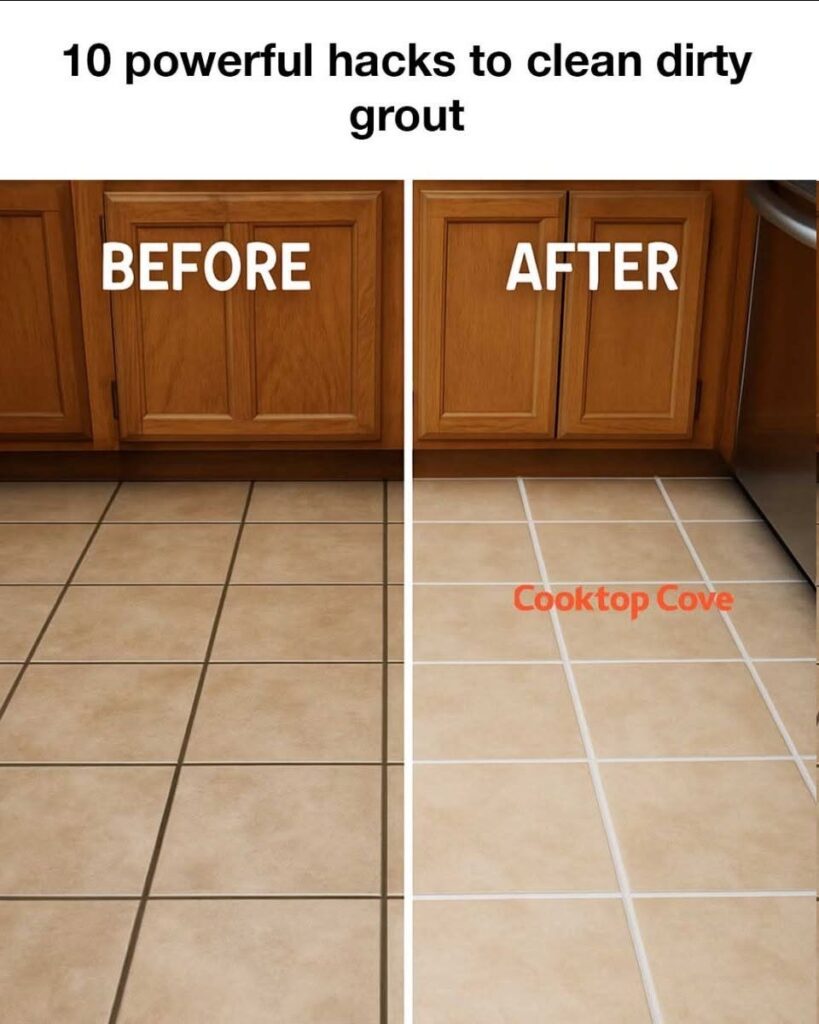
A viral social graphic shows a striking before-and-after split image of kitchen floor tiles under the title: “10 powerful hacks to clean dirty grout”. On the left, dark, discolored grout lines obscure the tile design; on the right, bright white, pristine grout completely transforms the look of the room.
Restoring dirty grout lines doesn’t require expensive professional regrouting. With basic household ingredients and proven cleaning techniques, you can lift deep stains and return your floors to a fresh, like-new appearance.
Here is the complete guide to 10 powerful grout cleaning hacks, step-by-step methods, and essential maintenance practices.
10 Powerful Hacks for Restoring Dirty Grout Lines
+-----------------------------------------------------------------------------------+
|                           GROUT CLEANING METHODS & USAGE                          |
+-------------------+----------------------------+----------------------------------+
| Cleaning Solution | Ideal Stain Type           | Application & Safety Tip         |
+-------------------+----------------------------+----------------------------------+
| Baking Soda &     | Everyday surface grime &   | Non-toxic; safe for all ceramic  |
| Hydrogen Peroxide | grease buildup             | and porcelain tile types         |
| Vinegar & Dish    | Mildew, water spots, and   | Avoid on natural stone (marble,  |
| Soap Paste        | mineral deposits           | limestone, or travertine)        |
| Steam Cleaning    | Deep embedded bacteria &   | Chemical-free high-heat vapor;   |
| Vapor             | stubborn ground-in dirt    | sanitize without residue         |
| Oxygen Bleach     | Organic discoloration &    | Safer, odorless alternative to   |
| Powder (OxiClean) | persistent dark stains     | harsh liquid chlorine bleach     |
+-------------------+----------------------------+----------------------------------+
1. The Baking Soda and Hydrogen Peroxide Paste
Mix two parts baking soda with one part hydrogen peroxide to create a thick paste. Spread the paste generously over the grout lines and let it sit for 10 to 15 minutes. The mild abrasive action of baking soda combined with the bubbling oxygen action of peroxide lifts trapped grime without scratching tile surfaces.
2. Oxygen Bleach Soak
Unlike chlorine bleach, which releases harsh fumes, oxygenated bleach powder (such as OxiClean) breaks down organic matter safely. Dissolve two tablespoons of oxygenated bleach powder in warm water, pour it over the tile floor, let it penetrate for 15 minutes, and scrub gently with a stiff brush.
3. Vinegar and Dish Soap Spray
For soap scum and hard water deposits, mix equal parts warm white distilled vinegar and liquid dish soap in a spray bottle. Spray the solution onto grout lines, allow the acid to break down mineral buildup for 10 minutes, and scrub clean. (Note: Do not use acidic vinegar on natural stone tile).
4. High-Pressure Handheld Steam Cleaner
Steam cleaning uses heat and water vapor under pressure to penetrate grout pores. The extreme temperature neutralizes mold spores, bacteria, and embedded grease instantly without requiring chemical cleaners.
5. Lemon Juice and Salt Scrub
The natural citric acid in fresh lemon juice acts as a mild bleaching agent, while coarse table salt acts as a gentle physical scrubbing element. Rub the mixture into discolored spots using an old toothbrush for targeted stain removal.
6. Dishwasher Detergent and Warm Water Gel
Commercial gel dishwasher detergents are specifically formulated to cut through tough kitchen grease and food oils. Apply gel detergent directly to kitchen tile grout, scrub after 5 minutes, and mop thoroughly with clean water.
7. Commercial Grout Pens for Quick Touch-Ups
When stains are permanent or grout is worn down, grout restorer paint pens offer an instant visual upgrade. These pens coat existing grout with a water-resistant white or beige enamel layer that seals out future stains.
8. Stiff-Bristled Narrow Grout Brushes
Using the right tool makes all the difference. Avoid wire brushes that can chip glaze, and opt for stiff nylon grout brushes with angled bristles designed specifically to reach deep inside recessed grout channels.
9. Electric Scrubbing Brushes
Save physical effort by using cordless oscillating cleaning brushes. Electric rotating brush heads vibrate thousands of times per minute, agitating cleaning solutions into porous grout far faster than manual scrubbing.
10. Preventive Penetrating Grout Sealer
Once your grout is thoroughly cleaned and dried, apply a quality penetrating grout sealer. Sealing creates an invisible hydrophobic barrier that prevents liquid, oil, and dirt from sinking into the cement matrix in the future.
How to Clean Grout Safely: Step-by-Step
Follow this simple, damage-free routine when refreshing your tile floors:
- Clear and Sweep: Sweep or vacuum the tile surface thoroughly to remove loose dust, sand, and debris before applying liquid solutions.
- Apply Solution and Dwell: Apply your chosen cleaning paste or spray and let it sit for 10 to 15 minutes. Allowing proper “dwell time” lets the chemical or enzymatic action loosen dirt automatically.
- Scrub and Rinse: Scrub along the grout lines using firm, direct pressure with a nylon brush. Mop the entire floor with warm water to eliminate remaining residue.
- Seal for Protection: Allow the floor to dry completely for 24 hours, then apply a clear silicone or fluoropolymer grout sealer along every line.
Financial Impact: DIY Refresh vs. Full Tile Replacement
Taking time to deep clean and seal existing grout offers major cost benefits:
- Substantial Remodeling Savings: Replacing kitchen or bathroom floor tile can cost thousands of dollars in demolition and labor. Deep cleaning and re-sealing grout restores the entire room’s visual appeal for under $20 in materials.
- Extending Tile Floor Lifespan: Regular grout maintenance prevents water from seeping beneath floor tiles, protecting subfloors from structural wood rot and costly water damage repairs.
Fascinating Facts About Grout Chemistry
- Cementitous Porosity: Standard unsanded and sanded grouts are cement-based matrices filled with microscopic capillary networks, which explains why unsealed grout absorbs spill liquids as easily as a sponge.
- Efflorescence Formation: The white chalky haze that sometimes forms on grout lines is called efflorescence, caused when soluble salts migrate to the surface as moisture evaporates out of fresh cement.
Conclusion: Transform Your Floors with Simple Care
Dirty grout lines can make even clean tile floors appear aged and neglected. By using gentle, effective remedies like baking soda, peroxide, or steam, you can eliminate stubborn stains and enjoy bright, beautiful floors throughout your home.
Frequently Asked Questions
Q1: Can vinegar damage grout lines?
A1: Vinegar is acidic and can erode unsealed cementitious grout over repeated long-term use. It should also never be used on natural stone tile like marble or granite.
Q2: How long does grout sealer last?
A2: High-traffic floor areas typically require grout sealer reapplication every 1 to 2 years, while low-traffic wall backsplashes can last up to 5 years.
Q3: What is the best brush for cleaning grout?
A3: A stiff nylon-bristle grout brush or an electric oscillating scrub brush is best; avoid steel wire brushes as they can scratch tile glazing.
Q4: Why does grout turn dark over time?
A4: Grout turns dark because its porous surface absorbs foot dirt, mopping dirty water, oil grease, and airborne dust particles.
Q5: How do you keep grout clean long-term?
A5: The single most effective way to keep grout clean is applying a deep-penetrating grout sealer once a year to keep dirt on the surface.
